Sunday, 27 December 2009
Exploding Text
This tutorial will teach you how to make text explode with light.
Create a new document in your copy of Photoshop.
Settings :

Now type some text with your pen tool
Use 48 pt, color black, the font is your choice.
The longer the text line, the more blur you will have to do. To keep it simple type in the word TutorialMan with caps and lower case.

Now we are going to rasterize our text layer. Right click on your text layer and select Rasterize. Your text layers will now switch from vector to pixel.
We're going to add a new layer now. Right click on the text layer you just rasterized and select Duplicate Layer
Select the new layer on your layer panel as your current editing layer.
Set your foreground color to white and click Edit > Fill.
Setting :

Now we are going to Blur your pixels: Select the menu Filter > Blur > Gaussian Blur.
Changing your coordinate scale actually interprets that your pixel points have been in a
polar graph and regraphs them in a rectangular graph which is the normal graph most are familiar with. (if you took advvanced math in hs you may remember the polar graph) What we are doing is changing the way the pixels are oriented, applying an effect to them in that new state, then will change the graphing method back.
Select Filter > Distort > Polar Coordinates.
Setting : Polar to Rectangular
Rotate your canvas to get your wind to orient correctly. Image > Rotate Canvas > 90 CW
Apply a wind to your active layer. Filter > Stylize > Wind.
Settings :

A little break in between. Your project should look something like this.

Apply wind a second time. Filter > Stylize > Wind
Adust the levelsby clicking Image > Adjust > Auto Levels
Click Image >Adjust >Invert
Apply wind a third time. Filter > Stylize > Wind
Apply wind a fourth and last time. Filter > Stylize > Wind
Rotate your canvas back to normal by clicking Image > Rotate Canvas > 90 CCW
Change your coordinates back by clicking Filter > Distort > Polar Coordinates.
Setting : Rectangular to Polar
On the layer panel Set Layer Mode to Hard Light.
Now it is time to colorize your image. Click Image > Adjust > Hue/Saturation.
Be sure to :
Check the "Colorize" checkbox and play with the settings of
Set saturations up to the top
Select the Hue of choice
set your saturation down to the level you want .
And you should get something like this
Create a new document in your copy of Photoshop.
Settings :
Now type some text with your pen tool
Use 48 pt, color black, the font is your choice.
The longer the text line, the more blur you will have to do. To keep it simple type in the word TutorialMan with caps and lower case.
Now we are going to rasterize our text layer. Right click on your text layer and select Rasterize. Your text layers will now switch from vector to pixel.
We're going to add a new layer now. Right click on the text layer you just rasterized and select Duplicate Layer
Select the new layer on your layer panel as your current editing layer.
Set your foreground color to white and click Edit > Fill.
Setting :
Now we are going to Blur your pixels: Select the menu Filter > Blur > Gaussian Blur.
Changing your coordinate scale actually interprets that your pixel points have been in a
polar graph and regraphs them in a rectangular graph which is the normal graph most are familiar with. (if you took advvanced math in hs you may remember the polar graph) What we are doing is changing the way the pixels are oriented, applying an effect to them in that new state, then will change the graphing method back.
Select Filter > Distort > Polar Coordinates.
Setting : Polar to Rectangular
Rotate your canvas to get your wind to orient correctly. Image > Rotate Canvas > 90 CW
Apply a wind to your active layer. Filter > Stylize > Wind.
Settings :
A little break in between. Your project should look something like this.
Apply wind a second time. Filter > Stylize > Wind
Adust the levelsby clicking Image > Adjust > Auto Levels
Click Image >Adjust >Invert
Apply wind a third time. Filter > Stylize > Wind
Apply wind a fourth and last time. Filter > Stylize > Wind
Rotate your canvas back to normal by clicking Image > Rotate Canvas > 90 CCW
Change your coordinates back by clicking Filter > Distort > Polar Coordinates.
Setting : Rectangular to Polar
On the layer panel Set Layer Mode to Hard Light.
Now it is time to colorize your image. Click Image > Adjust > Hue/Saturation.
Be sure to :
Check the "Colorize" checkbox and play with the settings of
Set saturations up to the top
Select the Hue of choice
set your saturation down to the level you want .
And you should get something like this
Blood Effect
1. Create new file with 72 PPI and white background. The mode has to be Grayscale. Type the text with thick font.

2. Select > Load Selection
(Choose Layer Transparency)
3. Layer > Flatten Image
4. Select > Inverse

5. Filter > Pixelate > Crystallize (cell size 4)
6. Select > Inverse

7. Noise > Add Noise
(Guassian, Monochromatic, Amount. 70)
8. Blur > Guassian blur (Radius 2.0)

9. Image > Adjust > Curve
(make the curve as shown in fig.)

10. Press Ctrl + D to deselect
11. Image > Adjust > Invert

12. Image > Rotate Canvas > 90 CW
13. Filter > Stylize > Wind
14. Method : Wind Direction : From the Right

15. Image > Rotate Canvas > 90 CCW
16. Image > Mode > RGB
17. Image > Adjust > Hue Saturation
18. Click Colorize
19. Drag the Saturation slider to 100
20. Drag the Lightness slider to -5

2. Select > Load Selection
(Choose Layer Transparency)
3. Layer > Flatten Image
4. Select > Inverse
5. Filter > Pixelate > Crystallize (cell size 4)
6. Select > Inverse
7. Noise > Add Noise
(Guassian, Monochromatic, Amount. 70)
8. Blur > Guassian blur (Radius 2.0)
9. Image > Adjust > Curve
(make the curve as shown in fig.)
10. Press Ctrl + D to deselect
11. Image > Adjust > Invert
12. Image > Rotate Canvas > 90 CW
13. Filter > Stylize > Wind
14. Method : Wind Direction : From the Right
15. Image > Rotate Canvas > 90 CCW
16. Image > Mode > RGB
17. Image > Adjust > Hue Saturation
18. Click Colorize
19. Drag the Saturation slider to 100
20. Drag the Lightness slider to -5
Thursday, 24 December 2009
FIND IP ADDRESS OF THE SENDER IN YAHOO MAIL
When you receive an email, you receive more than just the message. The email comes with headers that carry important information that can tell where the email was sent from and possibly who sent it. For that, you would need to find the IP address of the sender. The tutorial below can help you find the IP address of the sender. Note that this will not work if the sender uses anonymous proxy servers. Finding IP address in Yahoo! Mail 1. Log into your Yahoo! mail with your username and password. 2. Click on Inbox or whichever folder you have stored your mail. 3. Open the mail. 4. If you do not see the headers above the mail message, your headers are not displayed. To display the headers, * Click on Options on the top-right corner * In the Mail Options page, click on General Preferences * Scroll down to Messages where you have the Headers option * Make sure that Show all headers on incoming messages is selected * Click on the Save button * Go back to the mails and open that mail. 5. You should see similar headers like this:Yahoo! headers : nameLook for Received: from followed by the IP address between square brackets [ ]. Here, it is 202.65.138.109.That is be the IP address of the sender! 6. Track the IP address of the sender
Download complete websites to your desktop and surf them offline.
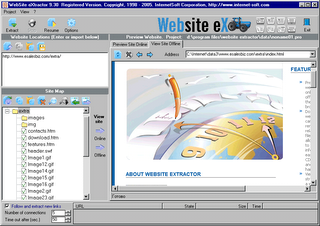 Website eXtractor saves you time and effort by downloading entire Internet sites (or the sections you stipulate) to your hard drive.
 Note: Using a regular browser to surf large websites or photo galleries takes the fun out of web browsing and makes research a real chore.
But now, with WebSite eXtractor, you can download whole websites (or parts of them) in one go to your computer. You can then view the whole site offline at your leisure - and you can whiz through the saved pages at lightning speed.
WebSite eXtractor is a great tool for researchers, journalists, students, equity analysts, business and marketing executives - as well as for those who want to browse family websites containing digital photo albums.
Advantages :
- Transfer whole websites to CD-ROM or floppy
- Another big benefit of the program is it changes html-links to relative names. In other words, it turns web addresses (URLs) into addresses that work on your computer.
- Researchers, writers, and journalists can easily archive reference material from the Internet.
- The program can download up to 100 files at a time, which saves you a huge amount of time compared to ordinary browsers.
- Website eXtractor automatically lets you download any files that were not copied due to transfer errors or bad connections.
To download the full version use the given torrent :
http://torrents.thepiratebay.org/3655896/Website_eXtractor_9.52_Retail.3655896.TPB.torrent
If you dont have torrent client download from here :
http://www.internet-soft.com/DEMO/webextrasetup.exe
Double Password ?
Disclaimer
These articles are intended for IT Professionals and systems administrators with experience servicing computer hardware. Please do not attempt any of these procedures if you are unfamiliar with computer hardware, and please use this information responsibly. We are not responsible for the use or misuse of this material, including loss of data, damage to hardware, or personal injury.The article is soley for educational purpose only.Strong passwords should have a significant length and cannot contain normal words. Only random digits and letters of different case. Such passwords are extremely hard to remember and it takes time to enter. But, even strong passwords have their weaknesses. When you type a password, it can be intercepted by a spy program that logs all your keystrokes. Others can see what you type (even if the password field on the screen is masked, the password can be read by buttons you hit on your keyboard.)
Until now, the only solution was to buy a secure token. A secure token is a hardware key that is used instead of or in addition to your normal password authentication. There are two main problems with the hardware solution, though. First, it is expensive. And second, you can use them only with software that has built-in support for this method of authentication.
But, from now on, you can turn any USB flash drive into a secure token! No need to purchase an additional expensive device. All you need is about 2 megabytes of free space on your flash drive or other USB gadget, such as an MP3 player, PDA or even a USB-pluggable mobile handset.
But, from now on, you can turn any USB flash drive into a secure token! No need to purchase an additional expensive device. All you need is about 2 megabytes of free space on your flash drive or other USB gadget, such as an MP3 player, PDA or even a USB-pluggable mobile handset.

How does it work? Our software, Double Password, installs onto your flash drive. When you type a password, the program intercepts it and converts it into a super-strong password string on-the-fly. You can use simple, easy-to-remember passwords without the risk of being cracked.
Another benefit of using Double Password is that nobody can steal your passwords. Spy programs are useless. Even if someone gets the "weak" password that you type on the keyboard, it means nothing. This password will only work when your USB flash is inserted.
While typical hardware locks will work only with software that supports secure tokens, Double Password works with any software. It simply substitutes your weak password with a strong one.
Double Password can be effectively used to securely lock your Windows account, to protect your laptop and to bring a new level of security to all software that uses password authentication.
Subscribe to:
Comments (Atom)

Copy this code to your website to display this banner!