Sunday, 27 December 2009
Exploding Text
 09:37 |
  Posted by
Rabiul islam
Posted by
Rabiul islam
This tutorial will teach you how to make text explode with light.
Create a new document in your copy of Photoshop.
Settings :

Now type some text with your pen tool
Use 48 pt, color black, the font is your choice.
The longer the text line, the more blur you will have to do. To keep it simple type in the word TutorialMan with caps and lower case.

Now we are going to rasterize our text layer. Right click on your text layer and select Rasterize. Your text layers will now switch from vector to pixel.
We're going to add a new layer now. Right click on the text layer you just rasterized and select Duplicate Layer
Select the new layer on your layer panel as your current editing layer.
Set your foreground color to white and click Edit > Fill.
Setting :

Now we are going to Blur your pixels: Select the menu Filter > Blur > Gaussian Blur.
Changing your coordinate scale actually interprets that your pixel points have been in a
polar graph and regraphs them in a rectangular graph which is the normal graph most are familiar with. (if you took advvanced math in hs you may remember the polar graph) What we are doing is changing the way the pixels are oriented, applying an effect to them in that new state, then will change the graphing method back.
Select Filter > Distort > Polar Coordinates.
Setting : Polar to Rectangular
Rotate your canvas to get your wind to orient correctly. Image > Rotate Canvas > 90 CW
Apply a wind to your active layer. Filter > Stylize > Wind.
Settings :

A little break in between. Your project should look something like this.

Apply wind a second time. Filter > Stylize > Wind
Adust the levelsby clicking Image > Adjust > Auto Levels
Click Image >Adjust >Invert
Apply wind a third time. Filter > Stylize > Wind
Apply wind a fourth and last time. Filter > Stylize > Wind
Rotate your canvas back to normal by clicking Image > Rotate Canvas > 90 CCW
Change your coordinates back by clicking Filter > Distort > Polar Coordinates.
Setting : Rectangular to Polar
On the layer panel Set Layer Mode to Hard Light.
Now it is time to colorize your image. Click Image > Adjust > Hue/Saturation.
Be sure to :
Check the "Colorize" checkbox and play with the settings of
Set saturations up to the top
Select the Hue of choice
set your saturation down to the level you want .
And you should get something like this
Create a new document in your copy of Photoshop.
Settings :
Now type some text with your pen tool
Use 48 pt, color black, the font is your choice.
The longer the text line, the more blur you will have to do. To keep it simple type in the word TutorialMan with caps and lower case.
Now we are going to rasterize our text layer. Right click on your text layer and select Rasterize. Your text layers will now switch from vector to pixel.
We're going to add a new layer now. Right click on the text layer you just rasterized and select Duplicate Layer
Select the new layer on your layer panel as your current editing layer.
Set your foreground color to white and click Edit > Fill.
Setting :
Now we are going to Blur your pixels: Select the menu Filter > Blur > Gaussian Blur.
Changing your coordinate scale actually interprets that your pixel points have been in a
polar graph and regraphs them in a rectangular graph which is the normal graph most are familiar with. (if you took advvanced math in hs you may remember the polar graph) What we are doing is changing the way the pixels are oriented, applying an effect to them in that new state, then will change the graphing method back.
Select Filter > Distort > Polar Coordinates.
Setting : Polar to Rectangular
Rotate your canvas to get your wind to orient correctly. Image > Rotate Canvas > 90 CW
Apply a wind to your active layer. Filter > Stylize > Wind.
Settings :
A little break in between. Your project should look something like this.
Apply wind a second time. Filter > Stylize > Wind
Adust the levelsby clicking Image > Adjust > Auto Levels
Click Image >Adjust >Invert
Apply wind a third time. Filter > Stylize > Wind
Apply wind a fourth and last time. Filter > Stylize > Wind
Rotate your canvas back to normal by clicking Image > Rotate Canvas > 90 CCW
Change your coordinates back by clicking Filter > Distort > Polar Coordinates.
Setting : Rectangular to Polar
On the layer panel Set Layer Mode to Hard Light.
Now it is time to colorize your image. Click Image > Adjust > Hue/Saturation.
Be sure to :
Check the "Colorize" checkbox and play with the settings of
Set saturations up to the top
Select the Hue of choice
set your saturation down to the level you want .
And you should get something like this
 Labels:

Blood Effect
1. Create new file with 72 PPI and white background. The mode has to be Grayscale. Type the text with thick font.

2. Select > Load Selection
(Choose Layer Transparency)
3. Layer > Flatten Image
4. Select > Inverse

5. Filter > Pixelate > Crystallize (cell size 4)
6. Select > Inverse

7. Noise > Add Noise
(Guassian, Monochromatic, Amount. 70)
8. Blur > Guassian blur (Radius 2.0)

9. Image > Adjust > Curve
(make the curve as shown in fig.)

10. Press Ctrl + D to deselect
11. Image > Adjust > Invert

12. Image > Rotate Canvas > 90 CW
13. Filter > Stylize > Wind
14. Method : Wind Direction : From the Right

15. Image > Rotate Canvas > 90 CCW
16. Image > Mode > RGB
17. Image > Adjust > Hue Saturation
18. Click Colorize
19. Drag the Saturation slider to 100
20. Drag the Lightness slider to -5

2. Select > Load Selection
(Choose Layer Transparency)
3. Layer > Flatten Image
4. Select > Inverse
5. Filter > Pixelate > Crystallize (cell size 4)
6. Select > Inverse
7. Noise > Add Noise
(Guassian, Monochromatic, Amount. 70)
8. Blur > Guassian blur (Radius 2.0)
9. Image > Adjust > Curve
(make the curve as shown in fig.)
10. Press Ctrl + D to deselect
11. Image > Adjust > Invert
12. Image > Rotate Canvas > 90 CW
13. Filter > Stylize > Wind
14. Method : Wind Direction : From the Right
15. Image > Rotate Canvas > 90 CCW
16. Image > Mode > RGB
17. Image > Adjust > Hue Saturation
18. Click Colorize
19. Drag the Saturation slider to 100
20. Drag the Lightness slider to -5
Thursday, 24 December 2009
FIND IP ADDRESS OF THE SENDER IN YAHOO MAIL
When you receive an email, you receive more than just the message. The email comes with headers that carry important information that can tell where the email was sent from and possibly who sent it. For that, you would need to find the IP address of the sender. The tutorial below can help you find the IP address of the sender. Note that this will not work if the sender uses anonymous proxy servers. Finding IP address in Yahoo! Mail 1. Log into your Yahoo! mail with your username and password. 2. Click on Inbox or whichever folder you have stored your mail. 3. Open the mail. 4. If you do not see the headers above the mail message, your headers are not displayed. To display the headers, * Click on Options on the top-right corner * In the Mail Options page, click on General Preferences * Scroll down to Messages where you have the Headers option * Make sure that Show all headers on incoming messages is selected * Click on the Save button * Go back to the mails and open that mail. 5. You should see similar headers like this:Yahoo! headers : nameLook for Received: from followed by the IP address between square brackets [ ]. Here, it is 202.65.138.109.That is be the IP address of the sender! 6. Track the IP address of the sender
Download complete websites to your desktop and surf them offline.
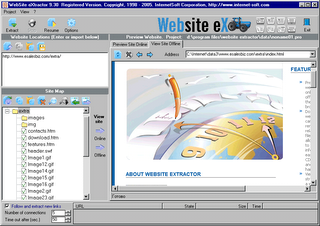 Website eXtractor saves you time and effort by downloading entire Internet sites (or the sections you stipulate) to your hard drive.
 Note: Using a regular browser to surf large websites or photo galleries takes the fun out of web browsing and makes research a real chore.
But now, with WebSite eXtractor, you can download whole websites (or parts of them) in one go to your computer. You can then view the whole site offline at your leisure - and you can whiz through the saved pages at lightning speed.
WebSite eXtractor is a great tool for researchers, journalists, students, equity analysts, business and marketing executives - as well as for those who want to browse family websites containing digital photo albums.
Advantages :
- Transfer whole websites to CD-ROM or floppy
- Another big benefit of the program is it changes html-links to relative names. In other words, it turns web addresses (URLs) into addresses that work on your computer.
- Researchers, writers, and journalists can easily archive reference material from the Internet.
- The program can download up to 100 files at a time, which saves you a huge amount of time compared to ordinary browsers.
- Website eXtractor automatically lets you download any files that were not copied due to transfer errors or bad connections.
To download the full version use the given torrent :
http://torrents.thepiratebay.org/3655896/Website_eXtractor_9.52_Retail.3655896.TPB.torrent
If you dont have torrent client download from here :
http://www.internet-soft.com/DEMO/webextrasetup.exe
Double Password ?
Disclaimer
These articles are intended for IT Professionals and systems administrators with experience servicing computer hardware. Please do not attempt any of these procedures if you are unfamiliar with computer hardware, and please use this information responsibly. We are not responsible for the use or misuse of this material, including loss of data, damage to hardware, or personal injury.The article is soley for educational purpose only.Strong passwords should have a significant length and cannot contain normal words. Only random digits and letters of different case. Such passwords are extremely hard to remember and it takes time to enter. But, even strong passwords have their weaknesses. When you type a password, it can be intercepted by a spy program that logs all your keystrokes. Others can see what you type (even if the password field on the screen is masked, the password can be read by buttons you hit on your keyboard.)
Until now, the only solution was to buy a secure token. A secure token is a hardware key that is used instead of or in addition to your normal password authentication. There are two main problems with the hardware solution, though. First, it is expensive. And second, you can use them only with software that has built-in support for this method of authentication.
But, from now on, you can turn any USB flash drive into a secure token! No need to purchase an additional expensive device. All you need is about 2 megabytes of free space on your flash drive or other USB gadget, such as an MP3 player, PDA or even a USB-pluggable mobile handset.
But, from now on, you can turn any USB flash drive into a secure token! No need to purchase an additional expensive device. All you need is about 2 megabytes of free space on your flash drive or other USB gadget, such as an MP3 player, PDA or even a USB-pluggable mobile handset.

How does it work? Our software, Double Password, installs onto your flash drive. When you type a password, the program intercepts it and converts it into a super-strong password string on-the-fly. You can use simple, easy-to-remember passwords without the risk of being cracked.
Another benefit of using Double Password is that nobody can steal your passwords. Spy programs are useless. Even if someone gets the "weak" password that you type on the keyboard, it means nothing. This password will only work when your USB flash is inserted.
While typical hardware locks will work only with software that supports secure tokens, Double Password works with any software. It simply substitutes your weak password with a strong one.
Double Password can be effectively used to securely lock your Windows account, to protect your laptop and to bring a new level of security to all software that uses password authentication.
Forbidden side of a web site-See what web sites hide from you
We all know what search engines do right? yes Search! baby search! they search every where for everything. And what do web site owners do? The do various SEO (search engine optimization) stuff to make the things easy for the search engines so the SE’s will search the directories inside the web sites easily and bring more traffic to the site!. Hm… Ok C.J.! enough of the technical stuff,why are you telling us all this? This is why…
Do you know that there are some directories in web sites that they don’t want the general public to know about? Well, there are! Then what do the site owners do to hide them from us? They bribe the search engines :D Hm…
well what they do is put a text file including the directory names, that should be excluded when searching. So the search engines read that file first and exclude their content in the search results page……
But you know that us geeks can’t stay out of trouble right? Yes! there’s a way you can see what are the hidden directories are! All you got to do is put /robots.txt after the domain name and see what the site owners don’t want you to see :twisted:
How about checking out what Mr.Bill Gates got to hide from us? :D Here you go
http://www.micr*s*ft.c*m/r*b*ts.txt
And what about larry and sergei? yeh!
http://www.g**gle.c*m/r*b*ts.txt
Do you know that there are some directories in web sites that they don’t want the general public to know about? Well, there are! Then what do the site owners do to hide them from us? They bribe the search engines :D Hm…
well what they do is put a text file including the directory names, that should be excluded when searching. So the search engines read that file first and exclude their content in the search results page……
But you know that us geeks can’t stay out of trouble right? Yes! there’s a way you can see what are the hidden directories are! All you got to do is put /robots.txt after the domain name and see what the site owners don’t want you to see :twisted:
How about checking out what Mr.Bill Gates got to hide from us? :D Here you go
http://www.micr*s*ft.c*m/r*b*ts.txt
And what about larry and sergei? yeh!
http://www.g**gle.c*m/r*b*ts.txt
What is my IP address
You would like to know what is your IP address when you are connected on the Internet? You can get your answer on several different ways. You can go to whatismyipaddress.com and you'll see your IP and where are you on Google map. But if you need more information you can go to Start - Run, than type CMD and press ENTER. There, just type
"ipconfig/all" (without quotes) and press ENTER. You will get more than IP address, you'll see full profile of your connection like on image bellow:
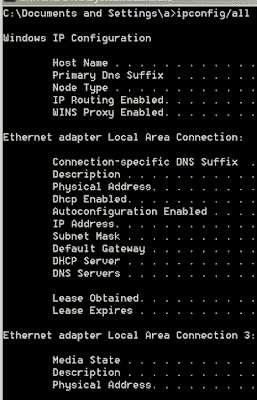
"ipconfig/all" (without quotes) and press ENTER. You will get more than IP address, you'll see full profile of your connection like on image bellow:

Learn Tricks And Tips Of The New Windows 7
Is Windows 7 the answer to all the questions that Windows Vista poses? Windows 7 is fast, stable and far more reliable than you'd expect.
Windows 7 is full of great new features and enhancements and was built around users feedback, so you'll see a lot of things you've asked for.
Microsoft has made its intentions clear: Windows 7 is intended to right the wrongs Vista wrought, but retain that operating system's good points. The OS will be quicker than Vista, which can only be a good thing.
And while it doesn't include major new features, take the time to explore and you'll find lots of useful changes that will make a real difference in how you use your PC.
Like any version of Windows there are various tips, tweaks and hacks you can perform to get your PC working the way you want it.
This book guides you through the 100 most asked questions on Windows 7 and on how to get the most from your Windows 7 installation.
Windows 7 is full of great new features and enhancements and was built around users feedback, so you'll see a lot of things you've asked for.
Microsoft has made its intentions clear: Windows 7 is intended to right the wrongs Vista wrought, but retain that operating system's good points. The OS will be quicker than Vista, which can only be a good thing.
And while it doesn't include major new features, take the time to explore and you'll find lots of useful changes that will make a real difference in how you use your PC.
Like any version of Windows there are various tips, tweaks and hacks you can perform to get your PC working the way you want it.
This book guides you through the 100 most asked questions on Windows 7 and on how to get the most from your Windows 7 installation.
Laptop Tips
Thermal dissipation - Laptop cooling
Never use your laptop directly on a surface that prevents proper air flow, such as inside the laptop case, on a blanket or pillow. Periodically check that vents are not obstructed. Use a mobile cooling pad if necessary.
Never use your laptop directly on a surface that prevents proper air flow, such as inside the laptop case, on a blanket or pillow. Periodically check that vents are not obstructed. Use a mobile cooling pad if necessary.
Battery charge - Laptop autonomy
Discharge completely your battery at least once per month.
Discharge completely your battery at least once per month.
Security - Laptop tracking
Use the CyberAngel security solution to track your laptop in case it is stolen.
Use the CyberAngel security solution to track your laptop in case it is stolen.
Viruses
It is not enough to have an antivirus program installed. It needs to be kept up-to-date, and we recommend to update it at least once per week.
It is not enough to have an antivirus program installed. It needs to be kept up-to-date, and we recommend to update it at least once per week.
Windows Updates
Make sure that your computer downloads Window Updates periodically and frequently. This will enhance stability and security of your operating system.
Make sure that your computer downloads Window Updates periodically and frequently. This will enhance stability and security of your operating system.
Carrying
Always use an appropriate carrying bag when traveling, to enhance shock absorption. Whenever you need to ship your laptop through a carrier (SUPS, FedEx, UPS, etc...), always use packaging specifically designed for laptops transit.
Always use an appropriate carrying bag when traveling, to enhance shock absorption. Whenever you need to ship your laptop through a carrier (SUPS, FedEx, UPS, etc...), always use packaging specifically designed for laptops transit.
Shocks
Because of they are designed to maximize mobility, laptops are prone to shocks. Always turn your laptop OFF before you move your notebook from a place to another, unless it is well stabilized on a stand that is designed to absorb shocks.
Because of they are designed to maximize mobility, laptops are prone to shocks. Always turn your laptop OFF before you move your notebook from a place to another, unless it is well stabilized on a stand that is designed to absorb shocks.
Humidity
Laptops are very sensitive to humidity. Avoid liquid exposure as much as you can (water, wine, etc...).
Laptops are very sensitive to humidity. Avoid liquid exposure as much as you can (water, wine, etc...).
Dust
Laptops are very sensitive to dust. Make sure the laptop is never left on a floor, but that it is always high on a table, desk, stand, etc... Check vents frequently to see if they are not obstructed.
Laptops are very sensitive to dust. Make sure the laptop is never left on a floor, but that it is always high on a table, desk, stand, etc... Check vents frequently to see if they are not obstructed.
Preventing Laptop Computer Theft
Laptop computers are easy targets for thieves. Laptop computers are small, valuable, can be removed quickly, and are easily hidden. Laptop computers can be worth up to $5000 or more. The laptop computer can be pawned at a pawnshop for half its value.
Here are a few tips to reduce the risk of having your laptop stolen.
- Don’t leave your laptop out in the open even for a second.
- Remember extreme temperatures can cause damage to your laptop.
- Transport your laptop in a nondescript case.
- Write down the serial number and keep it in a safe place.
- Always back up your information on disks and store them in a safe place.
Mozilla Firefox Hotkeys | Keyboard Shortcuts
| CTRL + A | Select all text on a webpage |
| CTRL + B | Open the Bookmarks sidebar |
| CTRL + C | Copy the selected text to the Windows clipboard |
| CTRL + D | Bookmark the current webpage |
| CTRL + F | Find text within the current webpage |
| CTRL + G | Find more text within the same webpage |
| CTRL + H | Opens the webpage History sidebar |
| CTRL + I | Open the Bookmarks sidebar |
| CTRL + J | Opens the Download Dialogue Box |
| CTRL + K | Places the cursor in the Web Search box ready to type your search |
| CTRL + L | Places the cursor into the URL box ready to type a website address |
| CTRL + M | Opens your mail program (if you have one) to create a new email message |
| CTRL + N | Opens a new Firefox window |
| CTRL + O | Open a local file |
| CTRL + P | Print the current webpage |
| CTRL + R | Reloads the current webpage |
| CTRL + S | Save the current webpage on your PC |
| CTRL + T | Opens a new Firefox Tab |
| CTRL + U | View the page source of the current webpage |
| CTRL + V | Paste the contents of the Windows clipboard |
| CTRL + W | Closes the current Firefox Tab or Window (if more than one tab is open) |
| CTRL + X | Cut the selected text |
| CTRL + Z | Undo the last action |
Windows Keyboard Shortcuts for Mozilla Firefox
| F1 | Opens Firefox help |
| F3 | Find more text within the same webpage |
| F5 | Reload the current webpage |
| F6 | Toggles the cursor between the address/URL input box and the current webpage |
| F7 | Toggles Caret Browsing on and off. Used to be able to select text on a webpage with the keyboard |
| F11 | Switch to Full Screen mode |
Increase the speed of your internet connection without a new modem
As more and more people get quick connections to the internet, such as cable or ADSL, it becomes apparent to the user of a simple dial-up modem that the World Wide Web can quickly turn into the World Wide Wait. Here a trick that can help speed up your current modem without shelling out the big bucks.
There is a setting located in your windows registry called the Maximum Transfer Unit (MTU). This determines the size of the packets of data sent between your and your server. In Windows 95, this setting is has a value of 1,500 bytes when the actual size of internet packets is 1,000 bytes. This can sometimes slow things down. To remedy the situation, simply follow these steps:
There is a setting located in your windows registry called the Maximum Transfer Unit (MTU). This determines the size of the packets of data sent between your and your server. In Windows 95, this setting is has a value of 1,500 bytes when the actual size of internet packets is 1,000 bytes. This can sometimes slow things down. To remedy the situation, simply follow these steps:
In the registry editor (Start > Run > regedit.exe), navigate to HKEY_LOCAL_MACHINE\System\CurrentControlSet\Services\Class\NetTrans. In the NetTrans folder you should find another folder named "000x" in which x represents a fourth digit. Right-click on the "000x" folder and select New and StringValue. Rename the item that appears in the panel on the right side to MaxMTU, then double-click it to bring up the Edit String box and give it a velue of 1002 .
Remember to keep playing with the MaxMTU value until you feel that your internet connection has greatly sped up. Some people report huge speed gains using this tricks, while others hardly notice a difference. In any case, it's definetly worth a try.
Hide Control Panel Applets (Windows 95/98/Me)
This tweak allows you to show or hide any of the applets found in the Windows Control Panel.
Open CONTROL.INI (usually found in the C:\WINDOWS) and add the following lines under the "[don't load]" subsection. If the "[don't load]" section doesn't already exist then create it be adding it on a new line at the end of the file.
For each control panel applet to be hidden add a new line with text in the format "applet.cpl=no" (e.g. fax.cpl=no).
Common Control Panel Applets:
Open CONTROL.INI (usually found in the C:\WINDOWS) and add the following lines under the "[don't load]" subsection. If the "[don't load]" section doesn't already exist then create it be adding it on a new line at the end of the file.
For each control panel applet to be hidden add a new line with text in the format "applet.cpl=no" (e.g. fax.cpl=no).
Common Control Panel Applets:
- access.cpl - Accessibility Applet
- appwiz.cpl - Add/Remove Programs Applet
- console.cpl - Console Applet
- timedate.cpl - Date and Time Applet
- desk.cpl - Display Applet
- fax.cpl - Fax Applet
- hdwwiz.cpl - Hardware Wizard Applet
- irprops.cpl - Infrared Port Applet
- intl.cpl - International and Regional Applet
- inetcpl.cpl - Internet Settings Applet
- joy.cpl - Joystick Applet
- liccpa.cpl - Licensing Applet
- main.cpl - Mouse and Keyboard Applet
- mlcfg32.cpl - Mail Applet
- mmsys.cpl - Sound and Multimedia Applet
- modem.cpl - Modem and Phone Applet
- ncpa.cpl - Network and connectivity Applet
- netcpl.cpl - Network and Dial-up Connectivity Applet
- nwc.cpl - Netware Client Applet
- odbccp32.cpl - ODBC Applet
- devapps.cpl - PC Card Applet
- ports.cpl - Ports Applet
- powercfg.cpl - Power Management Applet
- sticpl.cpl - Scanner and Camera Applet
- srvmgr.cpl - Server Manager Applet
- sapi.cpl - Speech Properties Applet
- sysdm.cpl - System Applet
- telephon.cpl - Telephony Applet
- tweakui.cpl - TweakUI Applet
- nusrmgr.cpl - User Manager Applet
- wspcpl32.cpl - WSP Client Applet
- quicktime.cpl - QuickTime Applet
- S32LUCP1.cpl - Norton Live Update Applet
- cpqmgmt.cpl - Compaq Insight Agents Applet
Enable/Disable Registry Editing tools
Copy the following code,paste in any notepad and save as "regtools.vbs" file. Just double click it and you will get yor regedit enabled.(Be careful to copy the code exactly as presented here including everything.
Code goes here.......
'Enable/Disable Registry Editing tools
'© Doug Knox - rev 12/06/99
'© Doug Knox - rev 12/06/99
Option Explicit
'Declare variables
Dim WSHShell, n, MyBox, p, t, mustboot, errnum, vers
Dim enab, disab, jobfunc, itemtype
Dim WSHShell, n, MyBox, p, t, mustboot, errnum, vers
Dim enab, disab, jobfunc, itemtype
Set WSHShell = WScript.CreateObject("WScript.Shell")
p = "HKCU\Software\Microsoft\Windows\CurrentVersion\Policies\System\"
p = p & "DisableRegistryTools"
itemtype = "REG_DWORD"
mustboot = "Log off and back on, or restart your pc to" & vbCR & "effect the changes"
enab = "ENABLED"
disab = "DISABLED"
jobfunc = "Registry Editing Tools are now "
p = "HKCU\Software\Microsoft\Windows\CurrentVersion\Policies\System\"
p = p & "DisableRegistryTools"
itemtype = "REG_DWORD"
mustboot = "Log off and back on, or restart your pc to" & vbCR & "effect the changes"
enab = "ENABLED"
disab = "DISABLED"
jobfunc = "Registry Editing Tools are now "
'This section tries to read the registry key value. If not present an
'error is generated. Normal error return should be 0 if value is
'present
t = "Confirmation"
Err.Clear
On Error Resume Next
n = WSHShell.RegRead (p)
On Error Goto 0
errnum = Err.Number
'error is generated. Normal error return should be 0 if value is
'present
t = "Confirmation"
Err.Clear
On Error Resume Next
n = WSHShell.RegRead (p)
On Error Goto 0
errnum = Err.Number
if errnum <> 0 then
'Create the registry key value for DisableRegistryTools with value 0
WSHShell.RegWrite p, 0, itemtype
End If
'Create the registry key value for DisableRegistryTools with value 0
WSHShell.RegWrite p, 0, itemtype
End If
'If the key is present, or was created, it is toggled
'Confirmations can be disabled by commenting out
'the two MyBox lines below
'Confirmations can be disabled by commenting out
'the two MyBox lines below
If n = 0 Then
n = 1
WSHShell.RegWrite p, n, itemtype
Mybox = MsgBox(jobfunc & disab & vbCR & mustboot, 4096, t)
ElseIf n = 1 then
n = 0
WSHShell.RegWrite p, n, itemtype
Mybox = MsgBox(jobfunc & enab & vbCR & mustboot, 4096, t)
End If
n = 1
WSHShell.RegWrite p, n, itemtype
Mybox = MsgBox(jobfunc & disab & vbCR & mustboot, 4096, t)
ElseIf n = 1 then
n = 0
WSHShell.RegWrite p, n, itemtype
Mybox = MsgBox(jobfunc & enab & vbCR & mustboot, 4096, t)
End If
Lock Icons On Desktop
You have arranged your desktop to look nicely with your wallpaper. Presently comes someone and mess up the nice arrangement. To lock your desktop icons into place, first arrange it carefully the way you want it to be, then open up the registry editor. Go to HKEY_CURRENT_USER\Software\Microsoft\Windows\CurrentVersion\Policies\Explorer. Right-click in the right pane and select New, DWORD Value name NoSaveSettings and press the Enter key. Right-click on the new NoSaveSettings item and select Modify. Enter 1 in the Value data box. After this, whenever you restart Windows, your settings will return to their current state.
Create A Hidden User Account
This tweak allows an account that is normally displayed on the Welcome screen to be hidden from view. To log on using the account it's necessary to use the Log On To Windows dialog box similar to the one in Windows 2000.#[Start] [Run] [Regedit]
#Registry Key: HKEY_LOCAL_MACHINE\SOFTWARE\Microsoft\WindowsNT\CurrentVersion\
Winlogon\SpecialAccounts\UserList
#Modify/Create the Value Data Type(s) and Value Name(s) as detailed below.
#Data Type: REG_DWORD [Dword Value] // Value Name: Type Name of Account to be Hidden
#Setting for Value Data: [0 = Account is Hidden / 1 = Enabled]
#Exit Registry and Reboot...
While the account is hidden on the Welcome screen, note that the account profile will be visible in C:\Documents and Settings or wherever user profiles are stored as well as in Local Users and Groups.
#Registry Key: HKEY_LOCAL_MACHINE\SOFTWARE\Microsoft\WindowsNT\CurrentVersion\
Winlogon\SpecialAccounts\UserList
#Modify/Create the Value Data Type(s) and Value Name(s) as detailed below.
#Data Type: REG_DWORD [Dword Value] // Value Name: Type Name of Account to be Hidden
#Setting for Value Data: [0 = Account is Hidden / 1 = Enabled]
#Exit Registry and Reboot...
While the account is hidden on the Welcome screen, note that the account profile will be visible in C:\Documents and Settings or wherever user profiles are stored as well as in Local Users and Groups.
Hacking Windows SEND TO MENU
How often do you copy songs from a CD? Or some photos from a CD?
What do you do? You select the required files and do a CTRL –C. Open the destination folder and do a CTRL-V. Here is something you can benefit time from. Customize your SEND TO MENU.
This sounds simple and you can do it in less than sixty seconds.
You can create your own BASKET.
First you’ll need access to hidden files. So change your view settings to make all hidden files visible.
Tools -> folder options -> view (tab) and select the show hidden files and folders.
go to parent drive:/documents and settings/(user name)/send to
Open up my computer and locate your most used folders.
Create a shortcut of the most used folders in SEND TO FOLDER.You can do this in a number of ways.
Right click -> send to desktop(create shortcut) and move the shortcut from the desktop to the SEND TO FOLDER
Copy the most used folder and go to SEND TO FOLDER and right click -> paste shortcut.
Also remember to rename the shortcuts to send to videos or send to potos. We don’t need confusion when we use the same later.
5. DONE
What do you do? You select the required files and do a CTRL –C. Open the destination folder and do a CTRL-V. Here is something you can benefit time from. Customize your SEND TO MENU.
This sounds simple and you can do it in less than sixty seconds.
You can create your own BASKET.
First you’ll need access to hidden files. So change your view settings to make all hidden files visible.
Tools -> folder options -> view (tab) and select the show hidden files and folders.
go to parent drive:/documents and settings/(user name)/send to
Open up my computer and locate your most used folders.
Create a shortcut of the most used folders in SEND TO FOLDER.You can do this in a number of ways.
Right click -> send to desktop(create shortcut) and move the shortcut from the desktop to the SEND TO FOLDER
Copy the most used folder and go to SEND TO FOLDER and right click -> paste shortcut.
Also remember to rename the shortcuts to send to videos or send to potos. We don’t need confusion when we use the same later.
5. DONE
Chang drives icon .
First of all copy a icon file to the root of the drive.
example: c:\icon.ico
Then create a file called: autorun.inf in c:\autorun.inf
then open that file and type the following:
[autorun]
icon=icon.ico
save and close the file.
Now open my computer and refresh.. and woh! icon changed....
you can apply to other drives too.
be careful:
"autorun.inf" and "ico.ico" must be in the root of the drive.
example: c:\autorun.inf and c:\icon.ico.
same on the root.
example: c:\icon.ico
Then create a file called: autorun.inf in c:\autorun.inf
then open that file and type the following:
[autorun]
icon=icon.ico
save and close the file.
Now open my computer and refresh.. and woh! icon changed....
you can apply to other drives too.
be careful:
"autorun.inf" and "ico.ico" must be in the root of the drive.
example: c:\autorun.inf and c:\icon.ico.
same on the root.
Disable CD Autorun
1) Click Start, Run and enter GPEDIT.MSC
2) Go to Computer Configuration, Administrative Templates, System.
3) Locate the entry for Turn autoplay off and modify it as you desire.
RUN Commands In Windows XP
You can access all these programs by going through START/RUN or Simply Click Windows Key+r
- SQL Client Configuration - cliconfg
- System Configuration Editor - sysedit
- System Configuration Utility - msconfig
- System File Checker Utility (Scan Immediately)- sfc /scannow
- System File Checker Utility (Scan Once At Next Boot)- sfc /scanonce
- System File Checker Utility (Scan On Every Boot) - sfc /scanboot
- System File Checker Utility (Return to Default Setting)- sfc /revert
- System File Checker Utility (Purge File Cache)- sfc /purgecache
- System File Checker Utility (Set Cache Size to size x)-sfc/cachesize=x
- Task Manager – taskmgr
- System Properties - sysdm.cpl
- Task Manager – taskmgr
- TCP Tester - tcptest
- Telnet Client - telnet
- Tweak UI (if installed) - tweakui
- User Account Management- nusrmgr.cpl
- Utility Manager - utilman
- Windows Address Book - wab
- Windows Address Book Import Utility - wabmig
- Windows Backup Utility (if installed)- ntbackup
- Windows Explorer - explorer
- Windows Firewall- firewall.cpl
- Windows Magnifier- magnify
- Windows Management Infrastructure - wmimgmt.msc
- Windows Media Player - wmplayer
- Windows Messenger - msmsgs
- Windows Picture Import Wizard (need camera connected)- wiaacmgr
- Windows System Security Tool – syskey
- Windows Update Launches - wupdmgr
- Windows Version (to show which version of windows)- winver
- Windows XP Tour Wizard - tourstart
- Wordpad - write
- Password Properties - password.cpl
- Performance Monitor - perfmon.msc
- Phone and Modem Options - telephon.cpl
- Phone Dialer - dialer
- Pinball Game - pinball
- Power Configuration - powercfg.cpl
- Printers and Faxes - control printers
- Printers Folder – printers
- Private Character Editor - eudcedit
- Quicktime (If Installed)- QuickTime.cpl
- Real Player (if installed)- realplay
- Regional Settings - intl.cpl
- Registry Editor - regedit
- Registry Editor - regedit32
- Remote Access Phonebook - rasphone
- Remote Desktop - mstsc
- Removable Storage - ntmsmgr.msc
- Removable Storage Operator Requests - ntmsoprq.msc
- Resultant Set of Policy (XP Prof) - rsop.msc
- Scanners and Cameras - sticpl.cpl
- Scheduled Tasks - control schedtasks
- Security Center - wscui.cpl
- Services - services.msc
- Shared Folders - fsmgmt.msc
- Shuts Down Windows - shutdown
- Sounds and Audio - mmsys.cpl
- Spider Solitare Card Game - spider
- Malicious Software Removal Tool - mrt
- Microsoft Access (if installed) - access.cpl
- Microsoft Chat - winchat
- Microsoft Excel (if installed) - excel
- Microsoft Frontpage (if installed)- frontpg
- Microsoft Movie Maker - moviemk
- Microsoft Paint - mspaint
- Microsoft Powerpoint (if installed)- powerpnt
- Microsoft Word (if installed)- winword
- Microsoft Syncronization Tool - mobsync
- Minesweeper Game - winmine
- Mouse Properties - control mouse
- Mouse Properties - main.cpl
- Nero (if installed)- nero
- Netmeeting - conf
- Network Connections - control netconnections
- Network Connections - ncpa.cpl
- Network Setup Wizard - netsetup.cpl
- Notepad - notepad
- Nview Desktop Manager (If Installed)- nvtuicpl.cpl
- Object Packager - packager
- ODBC Data Source Administrator- odbccp32.cpl
- On Screen Keyboard - osk
- Opens AC3 Filter (If Installed) - ac3filter.cpl
- Outlook Express - msimn
- Paint – pbrush
- Keyboard Properties - control keyboard
- IP Configuration (Display Connection Configuration) - ipconfi/all
- IP Configuration (Display DNS Cache Contents)- ipconfig /displaydns
- IP Configuration (Delete DNS Cache Contents)- ipconfig /flushdns
- IP Configuration (Release All Connections)- ipconfig /release
- IP Configuration (Renew All Connections)- ipconfig /renew
- IP Configuration(RefreshesDHCP&Re-RegistersDNS)-ipconfig/registerdns
- IP Configuration (Display DHCP Class ID)- ipconfig/showclassid
- IP Configuration (Modifies DHCP Class ID)- ipconfig /setclassid
- Java Control Panel (If Installed)- jpicpl32.cpl
- Java Control Panel (If Installed)- javaws
- Local Security Settings - secpol.msc
- Local Users and Groups - lusrmgr.msc
- Logs You Out Of Windows - logoff.....
- Accessibility Controls - access.cpl
- Accessibility Wizard - accwiz
- Add Hardware - Wizardhdwwiz.cpl
- Add/Remove Programs - appwiz.cpl
- Administrative Tools control - admintools
- Adobe Acrobat (if installed) - acrobat
- Adobe Designer (if installed)- acrodist
- Adobe Distiller (if installed)- acrodist
- Adobe ImageReady (if installed)- imageready
- Adobe Photoshop (if installed)- photoshop
- Automatic Updates - wuaucpl.cpl
- Bluetooth Transfer Wizard – fsquirt
- Calculator - calc
- Certificate Manager - certmgr.msc
- Character Map - charmap
- Check Disk Utility - chkdsk
- Clipboard Viewer - clipbrd
- Command Prompt - cmd
- Component Services - dcomcnfg
- Computer Management - compmgmt.msc
- Control Panel - control
- Date and Time Properties - timedate.cpl
- DDE Shares - ddeshare
- Device Manager - devmgmt.msc
- Direct X Control Panel (If Installed)- directx.cpl
- Direct X Troubleshooter- dxdiag
- Disk Cleanup Utility- cleanmgr
- Disk Defragment- dfrg.msc
- Disk Management- diskmgmt.msc
- Disk Partition Manager- diskpart
- Display Properties- control desktop
- Display Properties- desk.cpl
- Display Properties (w/Appearance Tab Preselected)- control color
- Dr. Watson System Troubleshooting Utility- drwtsn32
- Driver Verifier Utility- verifier
- Event Viewer- eventvwr.msc
- Files and Settings Transfer Tool- migwiz
- File Signature Verification Tool- sigverif
- Findfast- findfast.cpl
- Firefox (if installed)- firefox
- Folders Properties- control folders
- Fonts- control fonts
- Fonts Folder- fonts
- Free Cell Card Game- freecell
- Game Controllers- joy.cpl
- Group Policy Editor (XP Prof)- gpedit.msc
- Hearts Card Game- mshearts
- Help and Support- helpctr
- HyperTerminal- hypertrm
- Iexpress Wizard- iexpress
- Indexing Service- ciadv.msc
- Internet Connection Wizard- icwconn1
- Internet Explorer- iexplore
- Internet Setup Wizard- inetwiz
- Internet Properties- inetcpl.cpl
-
Lock your Private Folder
Suppose you want to lock the folder movies in d: which has the path D:\movies.In the same drive create a text file and type
ren movies movies.{21EC2020-3AEA-1069-A2DD-08002B30309D}
Now save this text file as loc.bat
Create another text file and type in it
ren movies.{21EC2020-3AEA-1069-A2DD-08002B30309D} movies
Now save this text file as key.bat
Now you can see 2 batch files loc and key. Press loc and the folder games will change to control panel and you cannot view its contents. Press key and you will get back your original folder.
try it out!!!!!!!
ren movies movies.{21EC2020-3AEA-1069-A2DD-08002B30309D}
Now save this text file as loc.bat
Create another text file and type in it
ren movies.{21EC2020-3AEA-1069-A2DD-08002B30309D} movies
Now save this text file as key.bat
Now you can see 2 batch files loc and key. Press loc and the folder games will change to control panel and you cannot view its contents. Press key and you will get back your original folder.
try it out!!!!!!!
Subscribe to:
Posts (Atom)

Copy this code to your website to display this banner!
