Showing posts with label internet. Show all posts
Showing posts with label internet. Show all posts
Thursday, 24 December 2009
FIND IP ADDRESS OF THE SENDER IN YAHOO MAIL
 10:36 |
  Posted by
Rabiul islam
Posted by
Rabiul islam
When you receive an email, you receive more than just the message. The email comes with headers that carry important information that can tell where the email was sent from and possibly who sent it. For that, you would need to find the IP address of the sender. The tutorial below can help you find the IP address of the sender. Note that this will not work if the sender uses anonymous proxy servers. Finding IP address in Yahoo! Mail 1. Log into your Yahoo! mail with your username and password. 2. Click on Inbox or whichever folder you have stored your mail. 3. Open the mail. 4. If you do not see the headers above the mail message, your headers are not displayed. To display the headers, * Click on Options on the top-right corner * In the Mail Options page, click on General Preferences * Scroll down to Messages where you have the Headers option * Make sure that Show all headers on incoming messages is selected * Click on the Save button * Go back to the mails and open that mail. 5. You should see similar headers like this:Yahoo! headers : nameLook for Received: from followed by the IP address between square brackets [ ]. Here, it is 202.65.138.109.That is be the IP address of the sender! 6. Track the IP address of the sender
 Labels:

Download complete websites to your desktop and surf them offline.
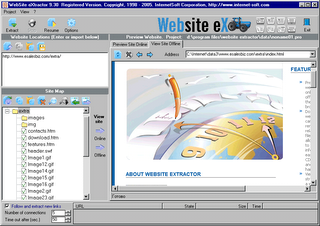 Website eXtractor saves you time and effort by downloading entire Internet sites (or the sections you stipulate) to your hard drive.
 Note: Using a regular browser to surf large websites or photo galleries takes the fun out of web browsing and makes research a real chore.
But now, with WebSite eXtractor, you can download whole websites (or parts of them) in one go to your computer. You can then view the whole site offline at your leisure - and you can whiz through the saved pages at lightning speed.
WebSite eXtractor is a great tool for researchers, journalists, students, equity analysts, business and marketing executives - as well as for those who want to browse family websites containing digital photo albums.
Advantages :
- Transfer whole websites to CD-ROM or floppy
- Another big benefit of the program is it changes html-links to relative names. In other words, it turns web addresses (URLs) into addresses that work on your computer.
- Researchers, writers, and journalists can easily archive reference material from the Internet.
- The program can download up to 100 files at a time, which saves you a huge amount of time compared to ordinary browsers.
- Website eXtractor automatically lets you download any files that were not copied due to transfer errors or bad connections.
To download the full version use the given torrent :
http://torrents.thepiratebay.org/3655896/Website_eXtractor_9.52_Retail.3655896.TPB.torrent
If you dont have torrent client download from here :
http://www.internet-soft.com/DEMO/webextrasetup.exe
Double Password ?
Disclaimer
These articles are intended for IT Professionals and systems administrators with experience servicing computer hardware. Please do not attempt any of these procedures if you are unfamiliar with computer hardware, and please use this information responsibly. We are not responsible for the use or misuse of this material, including loss of data, damage to hardware, or personal injury.The article is soley for educational purpose only.Strong passwords should have a significant length and cannot contain normal words. Only random digits and letters of different case. Such passwords are extremely hard to remember and it takes time to enter. But, even strong passwords have their weaknesses. When you type a password, it can be intercepted by a spy program that logs all your keystrokes. Others can see what you type (even if the password field on the screen is masked, the password can be read by buttons you hit on your keyboard.)
Until now, the only solution was to buy a secure token. A secure token is a hardware key that is used instead of or in addition to your normal password authentication. There are two main problems with the hardware solution, though. First, it is expensive. And second, you can use them only with software that has built-in support for this method of authentication.
But, from now on, you can turn any USB flash drive into a secure token! No need to purchase an additional expensive device. All you need is about 2 megabytes of free space on your flash drive or other USB gadget, such as an MP3 player, PDA or even a USB-pluggable mobile handset.
But, from now on, you can turn any USB flash drive into a secure token! No need to purchase an additional expensive device. All you need is about 2 megabytes of free space on your flash drive or other USB gadget, such as an MP3 player, PDA or even a USB-pluggable mobile handset.

How does it work? Our software, Double Password, installs onto your flash drive. When you type a password, the program intercepts it and converts it into a super-strong password string on-the-fly. You can use simple, easy-to-remember passwords without the risk of being cracked.
Another benefit of using Double Password is that nobody can steal your passwords. Spy programs are useless. Even if someone gets the "weak" password that you type on the keyboard, it means nothing. This password will only work when your USB flash is inserted.
While typical hardware locks will work only with software that supports secure tokens, Double Password works with any software. It simply substitutes your weak password with a strong one.
Double Password can be effectively used to securely lock your Windows account, to protect your laptop and to bring a new level of security to all software that uses password authentication.
Forbidden side of a web site-See what web sites hide from you
We all know what search engines do right? yes Search! baby search! they search every where for everything. And what do web site owners do? The do various SEO (search engine optimization) stuff to make the things easy for the search engines so the SE’s will search the directories inside the web sites easily and bring more traffic to the site!. Hm… Ok C.J.! enough of the technical stuff,why are you telling us all this? This is why…
Do you know that there are some directories in web sites that they don’t want the general public to know about? Well, there are! Then what do the site owners do to hide them from us? They bribe the search engines :D Hm…
well what they do is put a text file including the directory names, that should be excluded when searching. So the search engines read that file first and exclude their content in the search results page……
But you know that us geeks can’t stay out of trouble right? Yes! there’s a way you can see what are the hidden directories are! All you got to do is put /robots.txt after the domain name and see what the site owners don’t want you to see :twisted:
How about checking out what Mr.Bill Gates got to hide from us? :D Here you go
http://www.micr*s*ft.c*m/r*b*ts.txt
And what about larry and sergei? yeh!
http://www.g**gle.c*m/r*b*ts.txt
Do you know that there are some directories in web sites that they don’t want the general public to know about? Well, there are! Then what do the site owners do to hide them from us? They bribe the search engines :D Hm…
well what they do is put a text file including the directory names, that should be excluded when searching. So the search engines read that file first and exclude their content in the search results page……
But you know that us geeks can’t stay out of trouble right? Yes! there’s a way you can see what are the hidden directories are! All you got to do is put /robots.txt after the domain name and see what the site owners don’t want you to see :twisted:
How about checking out what Mr.Bill Gates got to hide from us? :D Here you go
http://www.micr*s*ft.c*m/r*b*ts.txt
And what about larry and sergei? yeh!
http://www.g**gle.c*m/r*b*ts.txt
Mozilla Firefox Hotkeys | Keyboard Shortcuts
| CTRL + A | Select all text on a webpage |
| CTRL + B | Open the Bookmarks sidebar |
| CTRL + C | Copy the selected text to the Windows clipboard |
| CTRL + D | Bookmark the current webpage |
| CTRL + F | Find text within the current webpage |
| CTRL + G | Find more text within the same webpage |
| CTRL + H | Opens the webpage History sidebar |
| CTRL + I | Open the Bookmarks sidebar |
| CTRL + J | Opens the Download Dialogue Box |
| CTRL + K | Places the cursor in the Web Search box ready to type your search |
| CTRL + L | Places the cursor into the URL box ready to type a website address |
| CTRL + M | Opens your mail program (if you have one) to create a new email message |
| CTRL + N | Opens a new Firefox window |
| CTRL + O | Open a local file |
| CTRL + P | Print the current webpage |
| CTRL + R | Reloads the current webpage |
| CTRL + S | Save the current webpage on your PC |
| CTRL + T | Opens a new Firefox Tab |
| CTRL + U | View the page source of the current webpage |
| CTRL + V | Paste the contents of the Windows clipboard |
| CTRL + W | Closes the current Firefox Tab or Window (if more than one tab is open) |
| CTRL + X | Cut the selected text |
| CTRL + Z | Undo the last action |
Windows Keyboard Shortcuts for Mozilla Firefox
| F1 | Opens Firefox help |
| F3 | Find more text within the same webpage |
| F5 | Reload the current webpage |
| F6 | Toggles the cursor between the address/URL input box and the current webpage |
| F7 | Toggles Caret Browsing on and off. Used to be able to select text on a webpage with the keyboard |
| F11 | Switch to Full Screen mode |
Increase the speed of your internet connection without a new modem
As more and more people get quick connections to the internet, such as cable or ADSL, it becomes apparent to the user of a simple dial-up modem that the World Wide Web can quickly turn into the World Wide Wait. Here a trick that can help speed up your current modem without shelling out the big bucks.
There is a setting located in your windows registry called the Maximum Transfer Unit (MTU). This determines the size of the packets of data sent between your and your server. In Windows 95, this setting is has a value of 1,500 bytes when the actual size of internet packets is 1,000 bytes. This can sometimes slow things down. To remedy the situation, simply follow these steps:
There is a setting located in your windows registry called the Maximum Transfer Unit (MTU). This determines the size of the packets of data sent between your and your server. In Windows 95, this setting is has a value of 1,500 bytes when the actual size of internet packets is 1,000 bytes. This can sometimes slow things down. To remedy the situation, simply follow these steps:
In the registry editor (Start > Run > regedit.exe), navigate to HKEY_LOCAL_MACHINE\System\CurrentControlSet\Services\Class\NetTrans. In the NetTrans folder you should find another folder named "000x" in which x represents a fourth digit. Right-click on the "000x" folder and select New and StringValue. Rename the item that appears in the panel on the right side to MaxMTU, then double-click it to bring up the Edit String box and give it a velue of 1002 .
Remember to keep playing with the MaxMTU value until you feel that your internet connection has greatly sped up. Some people report huge speed gains using this tricks, while others hardly notice a difference. In any case, it's definetly worth a try.
Tuesday, 22 December 2009
Chrome for Family Members and Stay Extra Safe
If you have started to love Google Chrome and have made it the default browser on your computer, here’s a useful tip regarding your privacy. The tip is more relevant for people who have computers in the living room and that same machine is shared among all other family members.

The address bar in Google Chrome is almost as dangerous as the awesome bar in Firefox.
To prevent yourself from getting into this not so comfortable’ situation, what you can do is create a separate user profile in Google Chrome. Thus all your browser history, bookmarks, cookies, search terms, etc. are not shared with anyone else in the family.
Step 1: Load Chrome and choose "Clear Browsing History" from the Tools menu. This will clear all your private data.
Step 2. Open your Google Chrome installation folder that is available at:
 Step 3: Open Windows Explorer and switch to the "User Data" folder available inside Chrome installation folder.
Then select the subfolder caleld "default" and make a copy of it in the "User Data" folder itself. Give that copy a name, say, Your_Name. (See screenshot).
Step 4 (Optional): We will now initialize this new "Your_Name" profile to the factory default settings.
Open "Command Prompt", switch to the Chrome Application folder and run the following command:
Right click anywhere on the desktop, choose New -> Shortcut and type the following for location:
For Windows Vista: C:\Users\Aryaman\AppData\Local\Google\Chrome\Application\chrome.exe –user-data-dir="..\User Data\Your_Name"
For Windows XP: C:\Documents and Settings\User\Local Settings\Application Data\Google\Chrome\Application\chrome.exe –user-data-dir="..\User Data\Your_Name"
 Give this shortcut a "hard to guess" name, change the icon to use that of, say, Microsoft Word and you’re done.
Now none of your visits to those "adult sites" would be known to anyone else in the family. And no need for you switch to that incognito browsing mode.
The address bar in Google Chrome is almost as dangerous as the awesome bar in Firefox.
Why You Need Separate Profiles in Google Chrome
Google Chrome makes it very easy for you to access your web search history including the search queries that you may have typed in the past. Now this may sometimes lead to an slightly embarrassing situation if someone else use your browser because all your past interactions are exposed the moment he or she begins to type in the address bar.To prevent yourself from getting into this not so comfortable’ situation, what you can do is create a separate user profile in Google Chrome. Thus all your browser history, bookmarks, cookies, search terms, etc. are not shared with anyone else in the family.
How to Create Profiles in Google Chrome Browser
Unlike Firefox that ships with a Profile Manager, the only way to create multiple profiles in Google Chrome browser is manually. Here’s how:Step 1: Load Chrome and choose "Clear Browsing History" from the Tools menu. This will clear all your private data.
Step 2. Open your Google Chrome installation folder that is available at:
For Windows Vista - C:\Users\\AppData\Local\Google\Chrome For Windows XP - C:\Documents and Settings\ \Local Settings\Application Data\Google\Chrome
Step 3: Open Windows Explorer and switch to the "User Data" folder available inside Chrome installation folder.Then select the subfolder caleld "default" and make a copy of it in the "User Data" folder itself. Give that copy a name, say, Your_Name. (See screenshot).
Step 4 (Optional): We will now initialize this new "Your_Name" profile to the factory default settings.
Open "Command Prompt", switch to the Chrome Application folder and run the following command:
chrome.exe --user-data-dir="..\User Data\Your_Name" -first-runStep 5: So our new user profile is ready. To run Google Chrome using this profile instead of the default profile, just create a shortcut on your desktop, Quick launch bar or your Windows Start Menu.
Right click anywhere on the desktop, choose New -> Shortcut and type the following for location:
For Windows Vista: C:\Users\Aryaman\AppData\Local\Google\Chrome\Application\chrome.exe –user-data-dir="..\User Data\Your_Name"
For Windows XP: C:\Documents and Settings\User\Local Settings\Application Data\Google\Chrome\Application\chrome.exe –user-data-dir="..\User Data\Your_Name"
Give this shortcut a "hard to guess" name, change the icon to use that of, say, Microsoft Word and you’re done. Now none of your visits to those "adult sites" would be known to anyone else in the family. And no need for you switch to that incognito browsing mode.
Chrome for Linux and Mac
The wait is finally over. Here are the links to download the first "official" beta releases of Google Chrome Browser for Mac and Chrome for Linux.
Google Chrome for Mac requires Mac OS X while the Linux version of Chrome supports Debian, Ubuntu, Fedora and openSUSE Linux.
Here are a few fun facts from the Google Chrome for Mac team (via email):
Google Chrome for Mac requires Mac OS X while the Linux version of Chrome supports Debian, Ubuntu, Fedora and openSUSE Linux.
Here are a few fun facts from the Google Chrome for Mac team (via email):
- 29 developer builds
- 73,804 lines of Mac-specific code written
- 64 Mac Minis doing continuous builds and tests
- 12 external committers and bug editors to the Google Chrome for Mac code base, 48 external code contributors
- 1,177 Mac-specific bugs fixed
- 2,713 Linux-specific bugs fixed
- 23 developer builds
- 60,000 lines of Linux-specific code written
- 12 external committers and bug editors to the Google Chrome for Linux code base, 48 external code contributors
Subscribe to Password-Protected Feeds inside Google Reader
Here’s a simple hack that will help you subscribe and follow any private feeds inside Google Reader provided you know the username and password that is required to view that feed in the browser.
It works like this. You can pass a private RSS feed to FeedBurner or Yahoo! Pipes using the above syntax, they’ll will automatically convert your feed into a public feed and you can then subscribe to the new feed inside Google Reader without requiring any username or password.
For instance, this RSS feed from Twitter requires authentication so you won’t be able to view the contents of the feed unless you know the account credentials. You can however subscribe to the same feed in Google Reader using either FeedBurner or Yahoo! Pipes.
It’s an easy workaround but you may not feel very comfortable as you have to add the password in plain text to the feed URL itself. Second, search engines may index your feed, you should definitely not use this with your Gmail Inbox or your private Flickr photos. Use FeedDemon instead.
That said, if there are feeds that are protected by password but don’t really contain any private data (say an invitation-only blog), here’s how you can subscribe to such feeds inside Google Reader.

Once you have created the feed, go to the “Publicize” tab in FeedBurner and turn on the NoIndex option so that your private feed does not get indexed in search engines.

Here’s a second screencast that illustrates how you can make a password-protected feed public with the help of Yahoo! Pipes.
When your “pipe” is complete, don’t publish it so it won’t appear on your Yahoo Pipes profile but you’ll still be able to subscribe to the converted RSS feed in any newsreader.
The advantage with Yahoo! Pipes is that is provides direct JSON output so developers can do more interesting things with the feed data.
Google Reader and Private RSS Feeds
Google Reader doesn’t allow feeds that require authentication but you can easily view such feeds inside services like Yahoo Pipes, Netvibes or even FeedBurner by adding the username and the password to the feed URL itself — see example:http://user:password@abc.com/rss-feed
It works like this. You can pass a private RSS feed to FeedBurner or Yahoo! Pipes using the above syntax, they’ll will automatically convert your feed into a public feed and you can then subscribe to the new feed inside Google Reader without requiring any username or password.
For instance, this RSS feed from Twitter requires authentication so you won’t be able to view the contents of the feed unless you know the account credentials. You can however subscribe to the same feed in Google Reader using either FeedBurner or Yahoo! Pipes.
It’s an easy workaround but you may not feel very comfortable as you have to add the password in plain text to the feed URL itself. Second, search engines may index your feed, you should definitely not use this with your Gmail Inbox or your private Flickr photos. Use FeedDemon instead.
That said, if there are feeds that are protected by password but don’t really contain any private data (say an invitation-only blog), here’s how you can subscribe to such feeds inside Google Reader.

1. Subscribe to Private Feeds via FeedBurner
The following video screencast shows how you can use FeedBurner to subscribe to private feeds inside Google Reader.Once you have created the feed, go to the “Publicize” tab in FeedBurner and turn on the NoIndex option so that your private feed does not get indexed in search engines.
2. Make Private Feeds Public with Yahoo! Pipes

Here’s a second screencast that illustrates how you can make a password-protected feed public with the help of Yahoo! Pipes.
When your “pipe” is complete, don’t publish it so it won’t appear on your Yahoo Pipes profile but you’ll still be able to subscribe to the converted RSS feed in any newsreader.
The advantage with Yahoo! Pipes is that is provides direct JSON output so developers can do more interesting things with the feed data.
Subscribe to:
Posts (Atom)

Copy this code to your website to display this banner!
